Sketchup is a useful program for effective 3d modeling and design. The sketchup models are 3d printable. Given below some useful tips to transform your sketchup design 3d printable.
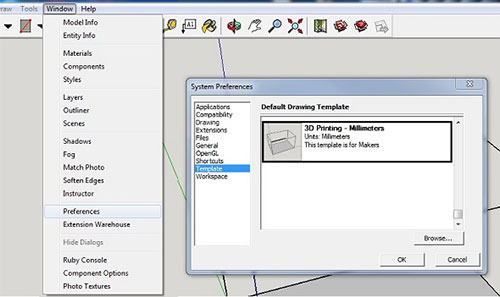
Your Template should be arranged in Millimeters or Inches: To get rid of the issue for re-scaling the printing size of the model in future, just arrange your sketchup templae to metric or imperial units.
In order to modify the template, go to Window > Preferences > Template and opt for ‘3D Printing – Millimeters’ or ‘3D Printing – Inches’.

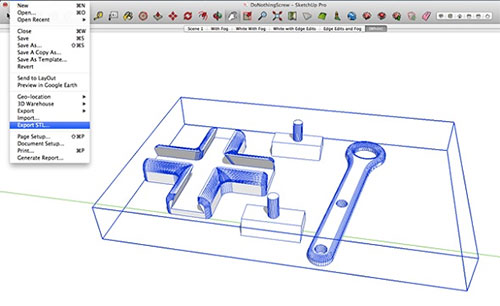
Set up the SketchUp STL Extension: Generally the sketchup models are saved as a SketchUp file (SKP). There exist a free STL Extension for sketchup and it is useful for 3d printing any sketchup model. The STL file format is most recognized in the 3D printing industry and it will facilitate to distribute, print, and edit your design in other software.
After installing the SketchUp STL extension, the users will be able to export their model as a STL file. While exporting, remember to choose the similar unit type that is already defined in your template (millimeters or inches) as well as select the binary file format for decreasing the file size.

Don't select Paper-Thin Surfaces & Set Wall Thicknesses: To convert your sketchUp model to 3d printable format, all the surfaces should contain a wall thickness. Devoid of defining a wall thickness, a 3D printer can't provide any information on depthness of the model (thick or thin) that is required to make the model 3d printable.
For more information, go through this blog post
Your Model should be Waterproof (Manifold): There should not be any hole in the surface of a printable model. If there is any hole, try to fill up them. This is most vital aspect for generating 3D printable models in SketchUp as sketchup treats the object as solid on the interior and printable.
Refrain from Internal Overlapping: If intersections and walls prevail inside your design, the model becomes complicared as the model must contain one continuous outer shell. So, it is recommened to arrange your model in a 2-dimensional space initially.
Verify wheather your model is solid or not: It becomes difficult, to generate watertight models with one persistent outside. For any kind of error, sketchup will alert you.
Given below the processes:
- Click thrice on your model by applying the select tool (everything will be selected).
- Right-click on your object and opt for ‘Make Group’.
- Right-click on your object further and choose ‘Entity Info’.
While creating design of an object with holes (not watertight) and inerior intersection (not in one shell) the Entity Info window will tell ‘Group’. It signifies that the model is not ready for printing and it should be rechecked. Right-click on it and choose ‘Explode’ to re-edit the components.
If a watertight model is designed in one shell, the Entity Info window will tell ‘Solid Group’ and then it is confirmed that your model is 3d printable.
See inward of Your Model with the ‘Hide Tool’ and ‘X-Ray-Mode’: You can't get any idea by seeing your model from the outside. If there are several modeling errors wihin your model, the object is not ready for 3d print. In the example below, the ‘Entity Info’ window indicates that the object is not solid.
In the following example, the ‘Entity Info’ window shows that the object is not solid. As it shows solid from the outside, the inside preview is required to view the activities in inside. Opt for a surface (face) that should be hidden and choose ''Edit’ >‘Hide’. Now you can easily find the errors which are troublesome. Otherwise, it is better to switch into x-ray-mode by selecting ‘View’ > ‘Face Style’ > ‘X-ray’.
Generate an ‘Outer Shell’: It is already discussed that the designs having overlapping objects can cause problems for 3D printers. But there exist an automatical solution for generating one ‘outer shell’ over the overlapping objects as well as removing all internal overlapping parts.
Resolves Reversed Faces (Inverted Normals): There may occur some other issues like inward-facing or reversed faces. It signifies that a surface of your model is facing in the improper direction (generally it denotes that it is facing the inside of the object rather than the outside). These surfaces are turned into light blue colors automatically.
To resolve it, right-click on the inward-facing surface (face) and opt for ‘Reverse Faces’.
Spread Circle/Arc Segments to Obtain Smooth Curves: With its visualization capability, SketchUp makes it possible to smooth the arcs and circles in preview. Even though circles seem to be accurately spherical in SketchUp, they are originally creared with 24 sides.Go to ‘View’ > ‘Hidden Geometry’ to view theses sides. While printing, this circle might appear little edged.
Whie choosing the arc or curve tool, SketchUp will will present their default sides in the bottom right corner. The number of sides can be extended by providing a greater number. Ratify your entry by pressing the ‘Enter’ key and then sketch your arc or circle.
Automatically prepare & fix file: Sometimes, it becomes difficult to detect the small issues. Solid Inspector is a very good sketchup extension that detects issues automatically and easily point out them. But it can't resolve the issue automatically.
SketchUp included a exclusive feature to their 3D Warehouse developed by Materialise. While uploading a model to the 3D Warehouse, the user can turn on “I want this to be 3D printable” button (see video below) to resolve the modeling errors fixed quickly.
This tool will help to transform your 3d model waterproof as well as download it as an STL file. This the most conveniet and quickest way to obtain a printable file.
- Cover Story
-
 SketchUp Can Help You Win Interior..
 -
 Best Laptops for SketchUp
 -
 How to Resize Textures and Materials..
 -
 Discovering SketchUp 2020
 -
 Line Rendering with SketchUp and VRay
 -
 Pushing The Boundary with architectural
 -
 Trimble Visiting Professionals Program
 -
 Diagonal Tile Planning in SketchUp
 -
 Highlights of some amazing 3D Printed
 -
 Review of a new SketchUp Guide
- Sketchup Resources
-
 SKP for iphone/ipad
 -
 SKP for terrain modeling
 -
 Pool Water In Vray Sketchup
 -
 Rendering Optimization In Vray Sketchup
 -
 Background Modification In sketchup
 -
 Grass Making with sketchup fur plugin
 -
 Landscape designing in Sketchup
 -
 Apply styles with sketchup
 -
 Bedroom Making with sketchup
 -
 Review of Rendering Software
 -
 Enhancing rendering for 3d modeling
 -
 The combination of sketchup
 -
 Exterior Night Scene rendering with vray


