Author : Bob Lang
Print Full-size Patterns from SketchUp
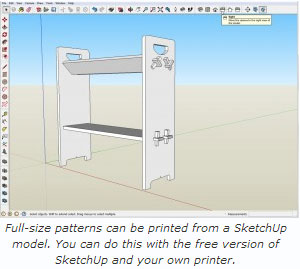
In my post on making a template for through mortises, I used a full-sized paper pattern that I printed from a SketchUp model. A reader posed the logical and obvious question “can you print a full-size pattern from the free version of SketchUp, or do you need special software and a special printer?” The short answer is yes, and the detailed answer is here.
At left is a screen shot of the SketchUp model. The model is available for free on the 3D warehouse. You can search on the term “Stickley Bookrack” or you can click on this link. Printing from SketchUp isn’t the easiest or most intuitive thing, but once you understand the steps of the process, it isn’t that bad. Generating full-size patterns from a SketchUp model is an incredibly valuable and powerful thing. In this example, the curved shapes of the end, and the size and location of the mortises come from the pattern. These things were drawn once in SketchUp, so there isn’t any need to draw them a second time out in the shop.

There are rules for printing at full size from SketchUp. The first of these is that you have to be in one of the “Standard” views. I have the “Standard Views” toolbar visible, so I just click on the appropriate little house icon. You can also find “Standard Views” under the “Camera” menu, not the “View” menu as you might suspect.That positions the camera in SketchUp to look at the model directly from the right side.
So far, so good. Rule number two is you have to turn off the “Perspective” view of the model and switch to “Parallel Projection”. That change is also made from the “Camera” menu. SketchUp can’t print to a specific scale from perspective. You can print to any scale you want to print working drawings, and you set the scale from the “Print Preview” window.
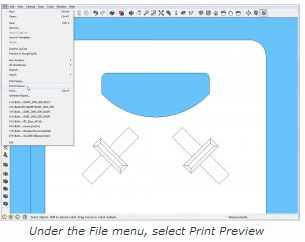
All of this is what things look like on a PC. On a Mac, a similar dialog opens but it isn’t quite the same. The same dialog will open if you select Print, but you need to be careful if you go that route. It’s easy to select OK and find that your printer is cheerfully spitting out dozens of pages.
SketchUp will automatically tile the print to however many pages it needs to get the job done. I’m after a single page showing the top of the side of the bookrack. The print function in the free version of SketchUp (SketchUp Make) is dependent on what is visible on the screen. If you want to print only a portion of a piece, zoom in so it fills most of the screen, and you also may need to resize the model window to roughly the proportions of the paper you want to print on. The actual piece is 10″ wide and to print on a letter size piece of paper, so I need to zoom way, way, in and set the printer to Landscape.
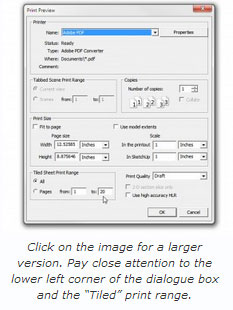
Here is what the dialogue box looks like. Checking or unchecking some of the boxes changes the options that are available. If you’re in “Print Preview” it’s safe to play around with the different settings to see what happens. When you click “OK” you will see what will go to your printer. To print to full size (or any specific scale) uncheck the box that says “Fit to page”. That lets you change the numbers below Scale. The numbers and units should match, as seen here where an inch in the printout equals an inch in SketchUp.
At the top of the box you can select your printer. I have my machine set to “print” an Adobe PDF file so I can show you the results. I can also select my inkjet printer and put these on letter or legal size paper. If you want a real big print on a single sheet, you can find software online that will let you create PDF files as a virtual printer. Set up the page size for a large sheet, 24 x 36 or 36 x 48 are standard sizes. You can then take (or e-mail) the PDF to someone with a great big printer (I use my local Staples store).
If you print on your own machine, PAY ATTENTION TO THE TILED SHEET PRINT RANGE in the lower left corner or the dialogue box. I took this screen shot before zooming way, way in and SketchUp is ready to print all of the model (along with a great deal of the background) on twenty sheets of paper. That’s 19 sheets more than I want, so I need to play around with the window size and my view to get it down to a single sheet.
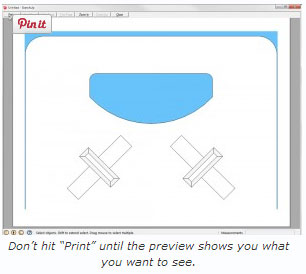
Here is the preview that I’m looking for — almost. The blue color is the “sky” background in SketchUp. Because I don’t want to run out of blue ink in my printer, I’ll go to the Styles window in SketchUp and turn off the display of the sky, or select a different style that is just lines. To make this fit, I held a piece of paper up to my screen to resize the window proportions and I zoomed in to fill the screen. I could also have selected legal size paper and wouldn’t need to get so close.
To make everything fit for the bottom of the side, I had to sacrifice the outer edges of the pattern and put it on a legal size sheet in Portrait orientation. Click Patterns From SKP to download a PDF file showing the results, directly from SketchUp. They may not be the prettiest things you’ve ever seen, but the are perfectly usable. When you print from SketchUp, or from a PDF generated from SketchUp make sure that the physical printer is set to print at 100%, not scaled to fit the page or an arbitrary print area. If you need to be sure that the print is at actual size, measure the printed output and compare the number with the SketchUp model dimensions.
- Cover Story
-
 SketchUp Can Help You Win Interior..
 -
 Best Laptops for SketchUp
 -
 How to Resize Textures and Materials..
 -
 Discovering SketchUp 2020
 -
 Line Rendering with SketchUp and VRay
 -
 Pushing The Boundary with architectural
 -
 Trimble Visiting Professionals Program
 -
 Diagonal Tile Planning in SketchUp
 -
 Highlights of some amazing 3D Printed
 -
 Review of a new SketchUp Guide
- Sketchup Resources
-
 SKP for iphone/ipad
 -
 SKP for terrain modeling
 -
 Pool Water In Vray Sketchup
 -
 Rendering Optimization In Vray Sketchup
 -
 Background Modification In sketchup
 -
 Grass Making with sketchup fur plugin
 -
 Landscape designing in Sketchup
 -
 Apply styles with sketchup
 -
 Bedroom Making with sketchup
 -
 Review of Rendering Software
 -
 Enhancing rendering for 3d modeling
 -
 The combination of sketchup
 -
 Exterior Night Scene rendering with vray


