Author : Patrick Williams
How to Create a Simple Bridge in Google SketchUp
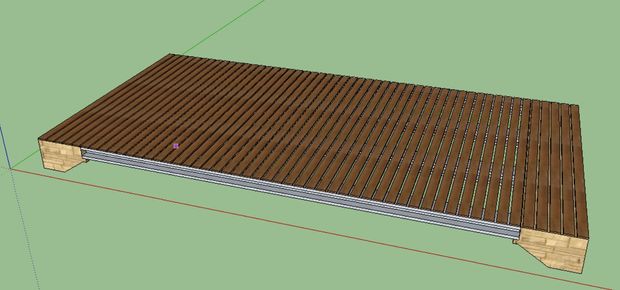
SketchUp is a wonderful program made free by Google that allows you to model 3D objects. The extent of this program is limited only by your own creativity and ambition. In this particular set of instructions, I am going to go through, step-by-step how to model a simple 3D bridge on Google SketchUp. If you follow my instructions, hopefully you will learn how the program works and begin designing your own 3D creations! If you are in any sort of engineering or design field, knowing how to functionally use SketchUp could help you show off your creations to a client or a boss in a more aesthetically pleasing way than a typical computer aided design (CAD) program could.
If you are completely new to the program, my instructions will try to explain to you how to work with Google SketchUp's various settings, tools and controls. If you have had experience with another 3D modeling program, you may find some similarities while working through this tutorial. The only things you will need to complete this tutorial is a computer, a connection to the internet, and about a half hour.
Step 1: How to Get Google SketchUp
All you need to run Google SketchUp is a computer and a connection to the internet. Google has made their program completely free, so you don't need to worry about busting out your credit card.
1.1 Go to http://www.sketchup.com/
1.2 Hit the button that says download
1.3 Once it is download, install the program to your hard drive
It's that simple!
Step 2: Starting the Program
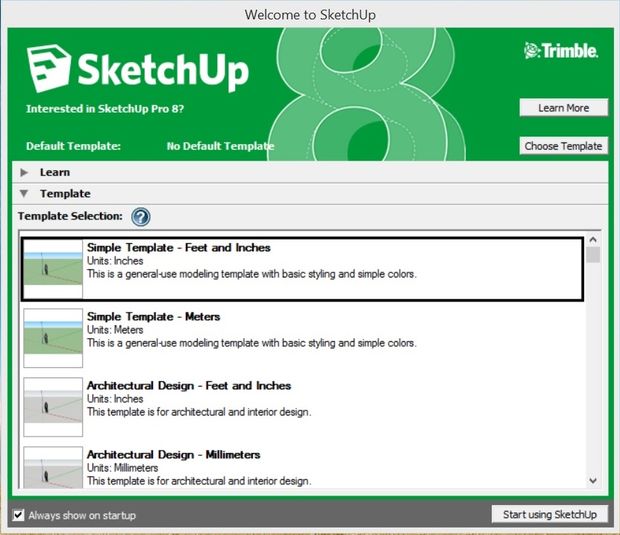
Once you installed SketchUp, you're ready to start it up.
2.1 Click the short cut for SketchUp 8 on your desktop
2.3 You're going to want to start a template to begin our bridge. Most of the world prefers to use the metric scale, but were going to use Feet and inches for this particular tutorial. Click choose template and then click feet and inches, which is the first option.
2.2 On the bottom right of the window, click "Start using SketchUp"
Step 3: Getting the Right Tools

SketchUp Offers a cornucopia of different tools that help design three dimensional models. However, in this particular tutorial we will only be using a handful of them. In the attached image, you can hover your mouse over the tools we will be using when building our bridge. If at any point in this tutorial you don't know which tool to use or how it works, refer back to this page to understand what each tool does.
Step 4: Starting Out
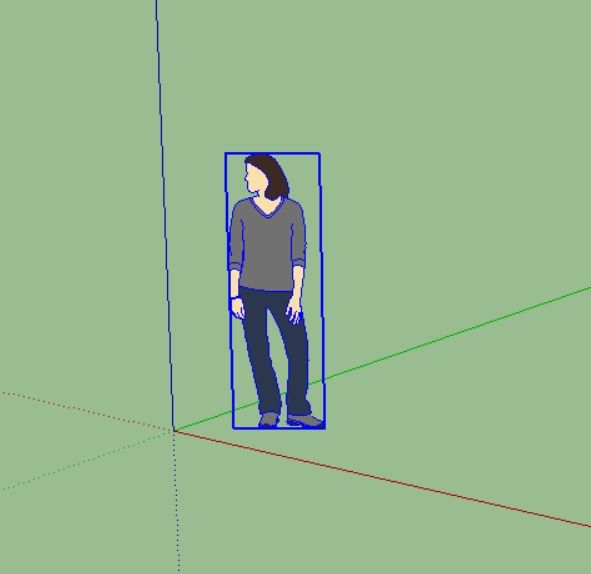
When the program starts up you're going to see the image of a girl near the origin. Some people like to leave her in as a reference so their model is scaled to a person in real life. She is unnecessary for this particular project so we are going to delete her.
4.1 Select the pointer tool
4.2 Click on the girl
4.3 Press delete on your keyboard
Step 5: Building the Support
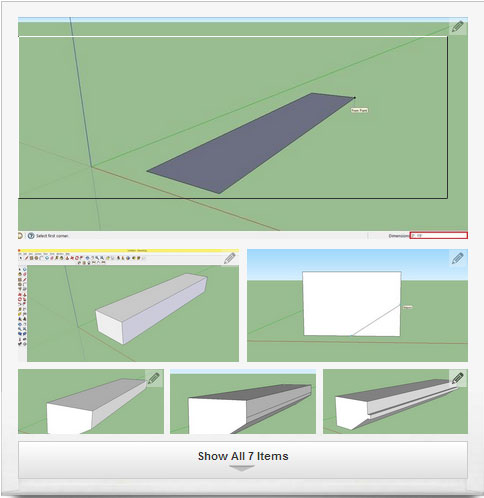
Every bridge needs a solid support to hold up the span. Our bridge's support will be two slabs of concrete about 50 feet apart.
5.1 Select the draw rectangle tool
5.2 Click and drag so the rectangle lies on the red and green axis
5.3 Before you let go type in "2', 15' " This means the dimensions of our rectangle is going to be 2 feet wide and 15 feet long. You can see what you are typing in in the bottom right hand corner as marked on the diagram.
5.4 Next you want to select the Push/Pull tool
5.5 Click on the rectangular space and pull it up along the blue axis. Before you let go of the mouse type in 2'. This means our block will be 2 feet thick.
5.6 Next Use the orbit tool to orient your view so your are looking directly at the square space.
5.7 Select the line tool and draw a line from the midpoint of the bottom of the block to the midpoint of the right side. You can tell you are on the midpoint because the mouse will stick to it and a little blue circle will appear.
5.8 Use the push/pull tool to push the newly drawn triangle through the block. This will cut the shape out of our rectangular block.
5.9 Next you are going to use the rectangle tool to draw a 3 inch by 15 foot rectangle on the right side of the block.
5.10 Finally you are going to use the push/pull tool to pull the rectangle out 3 inches. Remember to type in your dimensions before you let go of the mouse.
5.11 You are finally done building the bridges support! To finalize it we must make it a component. To do this use the pointer tool and double click the support. Right click the support and on the drop down menu, choose "Make Component"
Note: Making an object a component helps us put all of the pieces together later on.
Step 6: Making the I-beam
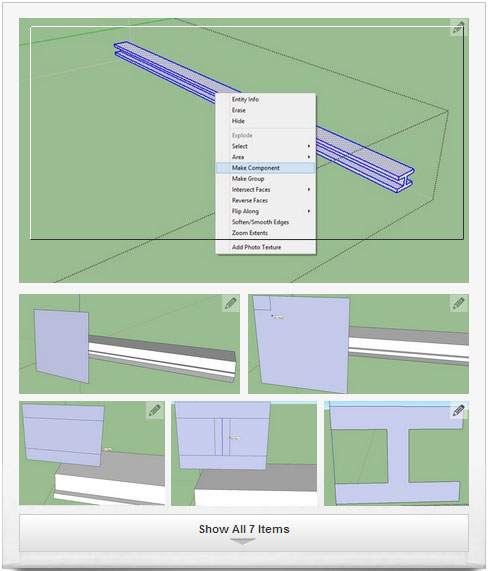
To draw the I-beam, it is simplest to draw a plane in the direction we want to have our beam's face oriented. Then we will cut out the unwanted pieces to form the shape of our I-beam's face.
6.1 Using the rectangle tool, draw a plane in the axis shown in image
6.2 Draw 1 foot by 9 inches rectangle by typing in 1', 9".
6.3 With the eraser, delete all of the square outside of the new one you just drew.
6.4 Draw 2 horizontal lines 3 inches from the top and bottom of the new square as shown in picture.
6.5 Draw a vertical line directly in the center from the two closest parallel lines.
6.6 Use the move tool and select the vertical line. Hit CTRL and it will clone the line. Move it both one inch to the right and one inch to the left.
6.7 With the eraser tool, delete all lines that do not belong in our beam. By the end it should look like a capital I.
6.8 Next we select the push/pull tool and expand the beam 25 feet out.
6.9 Double click the beam with your pointer tool, then right click and choose "Make Component."
Step 7: Making the Plank
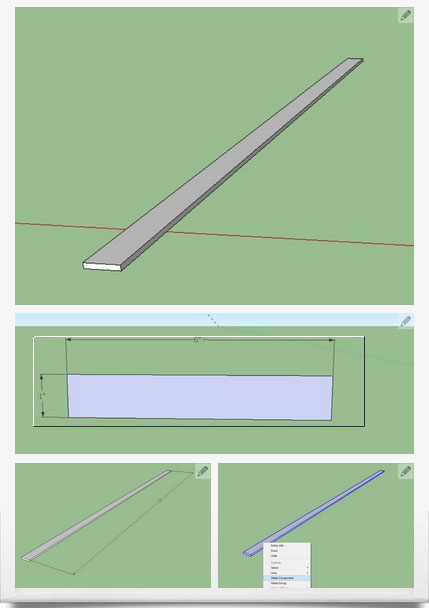
Making the plank should be very simple at this point so it shouldn't take very long to make.
7.1 With the rectangle tool draw a 6 inch by 1 inch shape.
7.2 Push it out with the push/pull tool 25 feet.
7.3 Double click the object. Right click and hit "Make Component."
Step 8: Copying and Rotating the Support
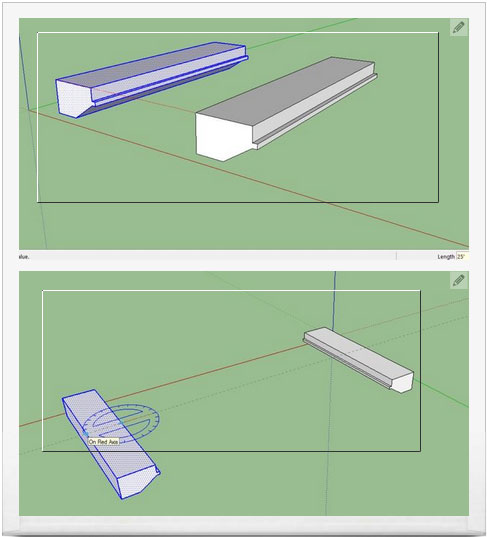
We know our bridge won't be able to be level if it only had one support. We must not copy our support and then place it at the opposite end of our bridge.
8.1 Click on the move tool and select the support. Next hit CTRL so the original support stays in place.
8.2 Drag the copied support out 25 feet with the push/pull tool and then type 25'.
8.3 Next we must rotate the support so it is facing the right way. Click to rotate tool and click on the midpoint of the new support. Move your mouse around the compass until it makes a 180 degree turn. Then click again to lock it into place.
Step 9: Placing the Beams onto the Support
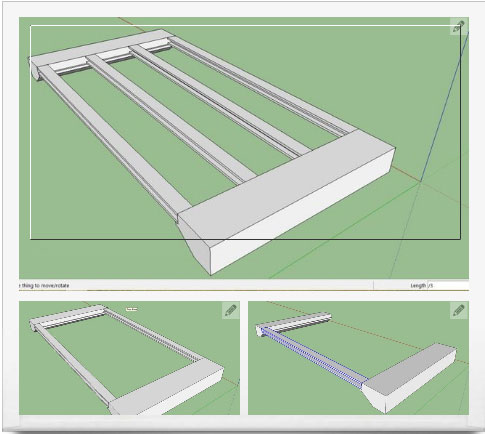
If the supports are like the shoulders of the bridge, then the beams are the back bone. They are what up the load on the bridge. Connecting them to our supports is very simple.
9.1 Click on the move tool and select the bottom corner of your I-Beam.
9.2 Drag it to the outermost corner of your supports where it should fit nicely. You will notice the beam fits perfectly between the two supports.
9.3 With the move tool click on the beam and also hit CTRL. Drag the beam down to the opposite end of the support as shown in picture 9.3.
9.4 Before you click anything, type in "/3" and hit Enter. This will create 3 copies of the beam in perfect spacing instead of one.
Step 10: Placing your Planks on your Bridge
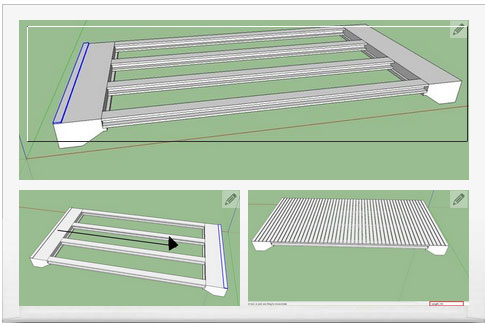
People need a place to walk on, so we are going to put wooden planks on top of the metal beams.
10.1 Select the move tool and then click on the plank. Move it to the very end of the bridge as shown in the picture.
10.2 With the move tool, drag the beam to the other side of the bridge while clicking CTRL to leave the original in place.
10.3 Before clicking anything else, type in "/50" which will copy the plank 50 more times in between the two outer planks.
Step 11: How to Add Color to your Bridge
Step 12: Conclusion
So now that we've successfully modeled this simple bridge using SketchUp, hopefully now you understand how to use the program for your own creative desires. You may want to research information about texturing and scene creation, as those can really enhance the presentation of your designs. The extent to the amount of things you can create with SketchUp is endless. Thank for using my tutorial on how to design a simple bridge in Google SketchUp, and I wish you all the best wishes to your future in 3D modeling.
- Cover Story
-
 SketchUp Can Help You Win Interior..
 -
 Best Laptops for SketchUp
 -
 How to Resize Textures and Materials..
 -
 Discovering SketchUp 2020
 -
 Line Rendering with SketchUp and VRay
 -
 Pushing The Boundary with architectural
 -
 Trimble Visiting Professionals Program
 -
 Diagonal Tile Planning in SketchUp
 -
 Highlights of some amazing 3D Printed
 -
 Review of a new SketchUp Guide
- Sketchup Resources
-
 SKP for iphone/ipad
 -
 SKP for terrain modeling
 -
 Pool Water In Vray Sketchup
 -
 Rendering Optimization In Vray Sketchup
 -
 Background Modification In sketchup
 -
 Grass Making with sketchup fur plugin
 -
 Landscape designing in Sketchup
 -
 Apply styles with sketchup
 -
 Bedroom Making with sketchup
 -
 Review of Rendering Software
 -
 Enhancing rendering for 3d modeling
 -
 The combination of sketchup
 -
 Exterior Night Scene rendering with vray


