Author : Matt Donley
Using Guides in Sketchup
With the Tape Measure tool, you can create an infinite guide line in SketchUp that allows you to use the power of the Inference System to snap to. I use guides all the time in my model to help me model accurately. But I also find myself creating “custom guide geometry” in order to help me place objects that are difficult to inference. In this post, I’ll show you how to create your own guide geometry.
If you don’t know about the Tape Measure tool, you should. It’s a great way to create a special type of line called a guide line that you can snap to in your model. I use them all the time when modeling. I’ll add a few in order to position an object, then delete them right after I’m done using them. Other times I’ll just leave guides in the model till I get overwhelmed with dashed lines everywhere,at which point I’ll go to the Edit menu and select “Delete guides” to get rid of them all.
But recently I’ve realized a need for a custom guide to help me position handles on some cabinet models I was working on. The way I used to place handles is I would position the handle at the corner of the door. From there, I’d move it to the left 2″, then move it up 3″. I was doing this for every handle, then realized there’s must be a better way!
Custom Guide Geometry : The Tape Measure tool produces a special SketchUp object called guide lines and guide points. What I’m talking about when I say “custom guide geometry” is creating regular SketchUp entities, but USING them as if they were guides. They aren’t meant to be shown in the final render or export of the model, they are only used to help assist in placing and aligning objects.
Custom guide geometry are lines or shapes that you group with another object in order to aid in the placement of that object.
In the case of the cabinet door handles, I simply created a set of rectangles that intersected at the point I wanted to offset from the corner of the door. So now instead of positioning the handle by snapping from a point on the handle, then offsetting left and then down, I was positioning it by snapping the guide geometry to the corner of the door. Done!
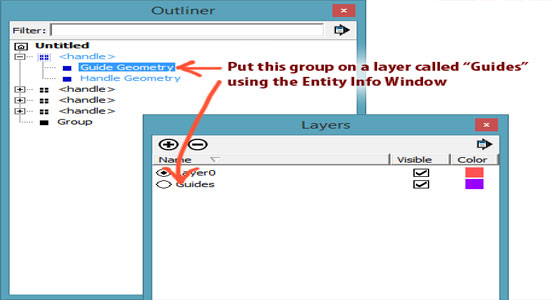
I assigned the guide geometry to a special Layer called “guides” that I can hide whenever I’m not positioning something. The key to creating guide geometry is how you organize the group/component. I used a component for this handle because I knew I’d need a bunch of them throughout my model. Inside the “Handle” component, you have the guide geometry in a group (assign this to the “Guide” layer), and the handle geometry in a group.
By combining the guide geometry and the object geometry into a group/component, you can move the entire collection as an assembly. But you can assign the guide geometry to a different layer in order to hide it when you don’t need it.

To create your own guides, you’ll need to be creative. Use a combination of lines or rectangles in order to create points that you might commonly use to offset placement of an object. I like to color the guides brightly so I can easily identify them. Also take advantage of mid point inferences. On the cabinet door handle, I included a line connecting each square, that way I could snap to the mid point of the drawer front.
Here are some examples of where you can create custom guide geometry to help you place an object.
- Pipes/cylinders – Place an “x” at the centerpoint of the pipe to make it easier to reference.
- Electrical outlets - Create a special component for each height outlet you need to place. Reference the floor with your guide, position the outlet at the correct height from the floor.
- Toilets/Bath Tubs/Fixtures/furniture - Pretty much any oddly shaped object can take advantage of using guide geometry. Create the geometry to have the correct offset from the wall for a standard installation.
- Windows/Doors - Reference the floor with guide geometry to locate window heights. You could also create a component that only had guide geometry in it that represented heights of different components in your model (outlets, switches, windows, doors, etc.) Place one of those components on each wall for easy referencing when placing objects at the correct height.

- Cover Story
-
 SketchUp Can Help You Win Interior..
 -
 Best Laptops for SketchUp
 -
 How to Resize Textures and Materials..
 -
 Discovering SketchUp 2020
 -
 Line Rendering with SketchUp and VRay
 -
 Pushing The Boundary with architectural
 -
 Trimble Visiting Professionals Program
 -
 Diagonal Tile Planning in SketchUp
 -
 Highlights of some amazing 3D Printed
 -
 Review of a new SketchUp Guide
- Sketchup Resources
-
 SKP for iphone/ipad
 -
 SKP for terrain modeling
 -
 Pool Water In Vray Sketchup
 -
 Rendering Optimization In Vray Sketchup
 -
 Background Modification In sketchup
 -
 Grass Making with sketchup fur plugin
 -
 Landscape designing in Sketchup
 -
 Apply styles with sketchup
 -
 Bedroom Making with sketchup
 -
 Review of Rendering Software
 -
 Enhancing rendering for 3d modeling
 -
 The combination of sketchup
 -
 Exterior Night Scene rendering with vray


