Author : Matt Donley
Layout Pattern Fill & Hatching with Sketchup Pro 2013
With the release of Sketchup Pro 2013 came the new pattern fill feature in Layout. Not only is this a great solution for providing hatches in your Layout documents, but pattern fill can also be used for creating a number of unique effects. I'm going to show you how people have been creating hatches in Sketchup, as well as how to use the new Pattern Fill feature in Layout.
A Hatch is a symbolic pattern added to a drawing in order to help identify materials, objects, and spaces. They also help define section cut planes. Architects have been doing this for decades. Even before computer aided drafting they would draw in hatches by hand.
- Most hatch patterns are standardized, which makes them universally understood by whomever is interpreting your drawing.
- Hatches help visually identify areas that represent materials or objects from areas that are just empty space.
- Hatches help differentiate between material types. For example, different types of wood look very similar to each other if rendered as a realistic material. However, if you use hatches to define the different types of material, the hatches are easily distinguishable. This ensures accurate interpretation of your drawings.
- Hatches help define the plane of a section cut.
- Hatches tend to communicate better when printed out on a black & white printer, as compared to printing out realistic materials applied from Sketchup. Plus, they save on ink.
Using Sketchup to create hatches
When using the section cut tool, the cutting plane would expose the back faces of everything being cut. There have been a few tricks people have used over the years in order to create hatches over their section cut plane.
- The Poché Effect A trick featured on the SketchUpdate blog, this trick "fills" your section cut with a solid black color. This is done by painting all of the interior faces of your model black, so when the section cut exposes the interior of an object, you can't distinguish the faces from the edges. This gives an illusion that the section cut plane is filled black.
- Interior Hatches Very similar to the first trick, instead of painting the interior faces solid black, you'd apply a "hatch" material to the interior of the object. However, this is only effective when viewing a section cut in orthographic mode from a parallel perspective.
- Create Group from Slice When you create a section cut, you can right click it and select "Create Group From Slice." Then you can add faces to the slice by retracing the edges and apply hatch materials (or colors) to those faces. This is the method used by Nick Sonder. He will import the "section cut slice" as a separate viewport and place it on top of another viewport in Layout. The tricky part with this method is you now have to organize all of the various groups and scenes you've created, and if you change your model you have to recreate the section slice. This process is made easier using the SectionCutFace plugin.
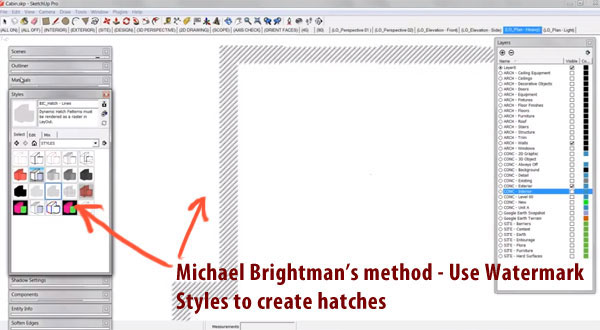
- Create Custom Hatch Style This is a REALLY cool way to create hatches in Sketchup. This method was created by Michael Brightman, author of the new bestselling book, The SketchUp Workflow for Architecture. I've read the book, I highly recommend it for people who are trying to figure out how to effectively create construction documents using Sketchup & Layout. I've personally learned a lot from the book. (Including this tip.)
Michael figured out a way to use custom watermarks as a mask to simulate a hatch. Check out this video. The best part about this method is that the hatch pattern is dynamic, meaning if you move something in Sketchup, the hatch will move with it. Also, it keeps the same scale no matter how much you zoom into the model.

Despite all of these methods, there has always been a need for creating hatches in Layout. People have been requesting pattern fill for a long time
Pattern Fill in Layout
The first thing you should know about the new Pattern Fill tool in Layout, is it's not exactly a "new tool". It's actually an additional attribute to the existing shape style panel.
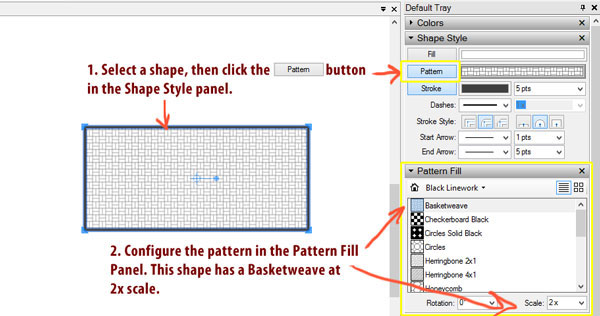
In previous versions of Layout, you could create a shape and assign it a fill color, and a stroke. (A Stroke is the outline around the shape). Now, you also have the ability to assign a pattern to a shape. It creates a tiled, repeating pattern within the confines of the shape based off of a raster image. The pattern fill property retains transparency, so a pattern can be used as a mask, or you can turn on the fill property of a shape to make the shape opaque.
My first instinct when I opened Layout 2013 was to click on the Pattern Fill window, select a pattern, and apply it to different parts of my Sketchup model viewport…..Wrong.
Patterns can only be applied to shapes created in Layout.
As soon as I realized that the Pattern Fill was actually a property of a shape in Layout, I stopped trying to apply patterns directly to my Sketchup model and figured out the right way to use it.
How NOT to use the Pattern Fill in Layout
- Do not try to apply patterns DIRECTLY to a Sketchup model in Layout. The pattern will not do what you think it will do. (Try it)
- Do not explode your Sketchup model in Layout in order to apply patterns to the resulting shapes.
- If you explode your model, it's no longer linked to your Sketchup file, and any changes made in Sketchup will not be reflected in Layout, so you'll be forced to re-import the model, explode it, and re-pattern it all over again. I also noticed that the resulting shapes created from the model created unexpected results in how they are filled.(If you feel like you're forced to do this, make sure you are in Vector mode before you explode it)
- Do not try to apply patterns as if it were a "tool".Pattern Fill is actually a style property of Layout Shapes, just like Stroke and Fill. To create a patterned SHAPE, you use one of Layout's drawing TOOLS (rectangle, circle, arc, line, etc.) to create the shape, then turn on the shape's pattern PROPERTY. You can then adjust that shape's pattern STYLE using the Pattern Fill panel. Confused? It's easy, see below.
The Right way(s) to use Pattern Fill
Aidan Chopra told me on my podcast that the intention for using the pattern fill is to set up your Sketchup model like you normally would. Add a viewport of your model into Layout. Then, create another layer and use the various drawing tools in Layout to trace over your Sketchup model. You then apply patterns to the shapes you create in Layout.
Create shape, then apply pattern
- Create a new Layer for your hatches, call it…."Hatches". (Or whatever)
- Create a shape on your new layer using the drawing tools in Layout. Typically, you'd trace over one of your Sketchup model viewports to create the desired hatch pattern area. Remember, Layout will snap to points within your model to guide you.
- Select the Shape
- In the "Shape Style" window, click the Pattern button to apply a pattern. (If you don't have a fill activated, you'll be able to "see through" the hatching. Most of the time you'll want to have a white fill applied to mask out whatever is behind the hatched shape.)
- Open the Pattern Fill panel to configure the pattern.

In the Pattern Fill panel, you can select from a number of built in patterns. They are categorized into geometric tiles, material symbols, site patterns, and tonal patterns. You can also create your own tile images and add them to your library.
Once you've selected a pattern, you can also define the rotation of the image, as well as the scale. You'll probably use the 45° rotation quite a bit. The scale will also come in handy to help you match the proportions of your viewport scale. Remember, you don't have to select a value from the drop down menus, you can put any value you like in there.
Other ways to apply patterns
- Multiple Selection- If you have a lot of shapes to apply patterns too, it's no fun having to select each one and configuring them one at a time. You could select multiple shapes at once using the Shift key, then configure the patterns for all of those shapes at once.
- Configure Tool- Another way of doing it would be to configure the tool first, then draw the shape. Whenever you activate any tool in Layout, you can configure the properties of that tool before you start drawing. Then, anything you draw with that tool will inherit those properties.
- Drag & Drop- Layout has the ability to drag and drop patterns onto shapes. Just open the Pattern Fill panel, click and drag the desired pattern onto a shape on the page to apply that pattern to it.
- Sample another shape- Just like other shape style properties, you can use the eye dropper tool to sample the style configuration of one shape, then "paint" that style configuration onto another shape. You can also sample shapes to quickly configure a tool. For example, activate the rectangle tool, then sample a shape with the eyedropper. Activate the rectangle tool again and you'll notice it has taken the style properties of the sampled shape.
When to use Pattern Fill
Most of the methods for creating hatches directly in Sketchup require an additional level of organization in order to execute properly. When you don't have the time to do that, creating hatches in Layout can be a quicker, more straightforward approach to applying hatches. If you expect to be changing the model quite a bit, however, it may be worth investing a little more time up front using the Michael Brightman method described above since the hatches are dynamic.
Creating hatches in Layout can also be a great solution for defining spaces that are not represented by 3D geometry. For example, ground planes are generally easier to represent in Layout.
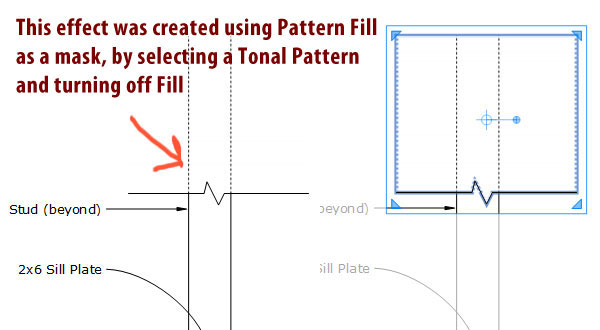
Pattern Fill can also be used to apply screens or masks over objects in Layout. Try playing around with some of the tonal patterns included in the Pattern Fill library. Using these patterns without a fill will create a mask that can help you represent special areas of your model, such as "existing structure, not to change".
You can also create masks that resemble a dashed line effect, allowing you to place other elements on top of the model for better clarity.

Although there are plenty of tricks that will create a hatch effect in Sketchup, sometimes you just need a way to do it manually in Layout. No, it won't be linked to your Sketchup model. And I wish there was a better way to manipulate shapes once they were drawn (For example, multiple point selection.) But honestly, this added feature is darn handy, and the end result does look really nice.
- Cover Story
-
 SketchUp Can Help You Win Interior..
 -
 Best Laptops for SketchUp
 -
 How to Resize Textures and Materials..
 -
 Discovering SketchUp 2020
 -
 Line Rendering with SketchUp and VRay
 -
 Pushing The Boundary with architectural
 -
 Trimble Visiting Professionals Program
 -
 Diagonal Tile Planning in SketchUp
 -
 Highlights of some amazing 3D Printed
 -
 Review of a new SketchUp Guide
- Sketchup Resources
-
 SKP for iphone/ipad
 -
 SKP for terrain modeling
 -
 Pool Water In Vray Sketchup
 -
 Rendering Optimization In Vray Sketchup
 -
 Background Modification In sketchup
 -
 Grass Making with sketchup fur plugin
 -
 Landscape designing in Sketchup
 -
 Apply styles with sketchup
 -
 Bedroom Making with sketchup
 -
 Review of Rendering Software
 -
 Enhancing rendering for 3d modeling
 -
 The combination of sketchup
 -
 Exterior Night Scene rendering with vray


