
Author : Matt Donley
Level of Detail Case Study - Rubik’s Cube
Whenever you start a new Sketchup model, you make decisions about the level of detail (whether consciously or sub-consciously). What drives those decisions is usually a combination of the size of your model, the amount of time you have to create the model, and the overall purpose of your model. In this article, we’ll look at a Rubik’s Cube and a couple of different approaches to modeling one.
Rubik’s Cube Level of Detail
A Rubik’s Cube is a clever puzzle, popularized in the 80′s, that consist’s of 26 colored cubes that are interlocked with each other. You can rotate each of the 6 faces of the cube to rearrange the individual colors. Once scrambled, the point is to arrange the cubes so that each face of the cube has a unique color on it.
I thought it would be cool to model a Rubik’s Cube in Sketchup, and it struck me that there were a number of different ways I could approach the project. They would all technically be a Rubik’s Cube, but the amount of detail put into each model would vary greatly.
With any Sketchup model, the objective is to create a digital representation of something that effectively communicates our ideas. In order to evaluate whether or not we are successful in that objective, we need to first define what it is exactly we are trying to communicate.
Each model we create has a specific purpose. If we were drawing a Rubik’s Cube for example, we might define our purpose as one of the following:
1. A Smaller Element Within a Bigger Model
Perhaps I am creating a model of a room and I want to add some objects to the model to make it look more “lived in”. I may decide to add a Rubik’s Cube onto the coffee table, next to some magazines and a tv remote.
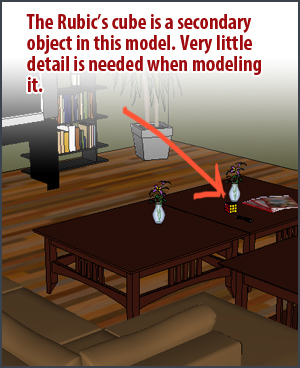
OBJECTIVE: Create a simple model of a Rubik’s Cube to place within a model of a living room in order to add some additional detail to the scene.
In this case, the Rubik’s Cube is far from the center of attention in the model, so I wouldn’t need to spend much time creating it. I would only need to add enough detail to the Rubik’s cube so that people will easily recognize it.
I can define simple characteristics that I need to model in order to accomplish this. I’m confident that if I can incorporate these few characteristics into my model, I will have effectively communicated my design for its purpose.
CHARACTERISTICS:
- Level of accuracy: 1/4″
- The overall shape should be 2 1/4″ x 2 1/4″ x 2 1/4″
- Each face should be colored the same colors as a Rubik’s Cube (White, Yellow, Red, Orange, Blue, Green)
- Each face should be subdivided into 9 squares to create the illusion of the smaller cubes.
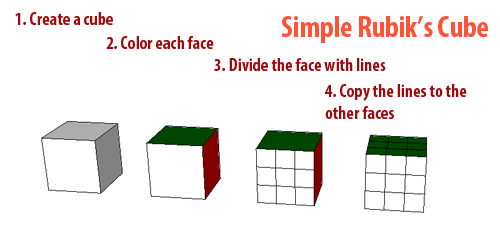
A very simple model, we only model the very basics of the cube in order for people to identify that it is a Rubik’s Cube. Beyond that, we don’t need to add any additional details.
2. Demonstrate a Rubik’s cube
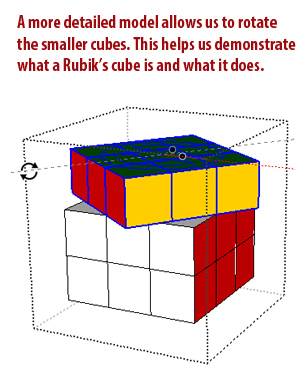
If I were trying to demonstrate what a Rubik’s Cube is to someone, I would want to add more detail so that each face of the cube could rotate. In order to do that, I’d have to create each of the smaller cubes as separate groups so that they could be rotated and rearranged.
OBJECTIVE: Create a model that will demonstrate to someone what a Rubik’s Cube is and how it works.
In this model, the Rubik’s Cube would be the only thing in our model, so it will definitely be the center of attention. But since our purpose of modeling it is only to demonstrate the basic concepts of what it looks like and how it works, we still don’t have to go crazy with the details. In fact, we could just send our friend to Werner RandelShofer’s website and avoid having to create the model in the first place, lol.
CHARACTERISTICS:
- Level of accuracy: 1/4″
- The overall shape should be 2 1/4″ x 2 1/4″ x 2 1/4″
- The faces of the cubes should be colored accordingly (White, Yellow, Red, Orange, Blue, Green)
- The cube needs to be divided into 26 smaller cubes that are grouped independently from each other

This model is a little more detailed, but still pretty basic. The main difference is that we’ve drawn the cube using many smaller cubes. This has given us the ability to manipulate the cube similarly to how you would in real life.
3. An intricate analysis of a Rubik’s Cube
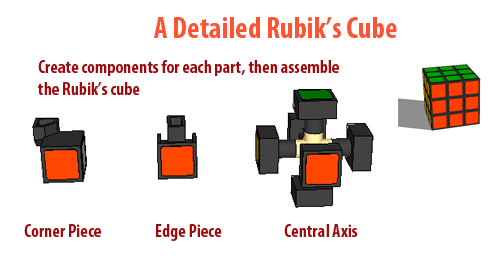
In this model, I would have a lot of detail. I want to show how each piece of the cube is connected to one another, so I would model all the interior parts. Since the colors on a Rubik’s Cube are actually stickers, I’d create separate components for the stickers and color them accordingly.
OBJECTIVE: Create a detailed model of a Rubik’s Cube and all of its parts in order to understand how the cube physically works.
Since we are trying to understand exactly how a Rubik’s Cube works and how it is physically built, I need to take one apart to analyze it. I need to identify each part that makes up the cube, and measure it carefully. I can also identify parts of the cube that are identical to each other, and use components for those pieces in Sketchup.
CHARACTERISTICS:
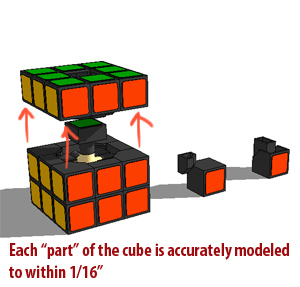
- Level of accuracy: 1/16″
- Each piece of the Rubic’s Cube should be modeled to show their internal structure
- The stickers on the cubes should be modeled separately from the black plastic parts
- The internal axis of the Rubik’s cube should be modeled
- Parts should be grouped in a way that allows easy rotation of the Rubik’s cube faces
The Importance of Defining the Level of Detail
From these three examples, you can see how drastically different these models are from each other. They are all models of a Rubik’s Cube, but the level of detail is so different between them. You should ask yourself how detailed your model needs to be before you start modeling.
If you’re modeling a house, do you need to model the structure hidden behind the walls? Do you even need to model the interior of the house? If you’re creating a model of a new neighborhood of houses, the answer is probably no. Thinking about these things ahead of time will save you time and also provide clear expectations for other members of the design team.
The next time you sit down to create a model, stop and think about the purpose of your model and try to define the level of detail in your head before you start modeling.

- Sponsored Plugins


- Sponsored Plugins

- Cover Story
-
 SketchUp Can Help You Win Interior..
 -
Best Laptops for SketchUp
-
How to Resize Textures and Materials..
-
Discovering SketchUp 2020
-
Line Rendering with SketchUp and VRay
-
Pushing The Boundary with architectural
-
Trimble Visiting Professionals Program
-
Diagonal Tile Planning in SketchUp
-
Highlights of some amazing 3D Printed
-
Review of a new SketchUp Guide
- Sketchup Resources
-
SKP for iphone/ipad
-
SKP for terrain modeling
-
Pool Water In Vray Sketchup
-
Rendering Optimization In Vray Sketchup
-
Background Modification In sketchup
-
Grass Making with sketchup fur plugin
-
Landscape designing in Sketchup
-
Apply styles with sketchup
-
Bedroom Making with sketchup
-
Review of Rendering Software
-
Enhancing rendering for 3d modeling
-
The combination of sketchup
-
Exterior Night Scene rendering with vray