
Author : Jim Leggitt
Digital Watercolor Effect with Google SketchUp

I love exploring new methods for visualizing conceptual design that combine traditional hand drawing with 2D/3D digital tools such as Google SketchUp,Shaderlight and Adobe Photoshop. This specific technique is called a “digital watercolor” as it comes close to what a traditional watercolor painting looks like but is achieved with colored markers and Photoshop filters.
This project was for the promotion of a new museum classroom in a fundraising campaign. I began with the building’s Google SketchUp model built by the museum architect, populated the space with entourage and then transformed the SketchUp view into the final digital watercolor. My two step process - 1) project modeling and 2) project rendering is explained below.
Step 1 - Project Modeling
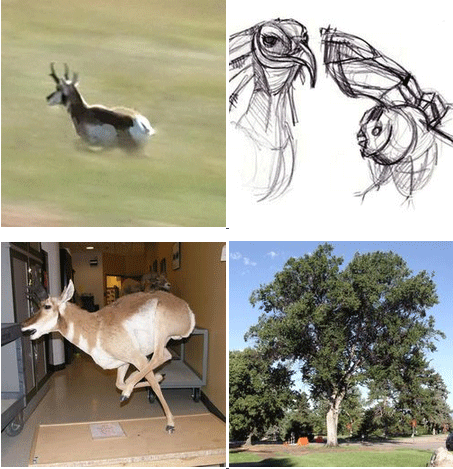
Research Images. The museum established a “prairie” theme for the classroom and supplied some photographs of a mounted antelope and other background visuals for the scene. I photographed the actual tree that was visible from within the classroom. All images were incorporated into the SketchUp model.
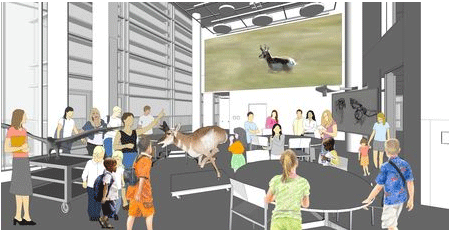
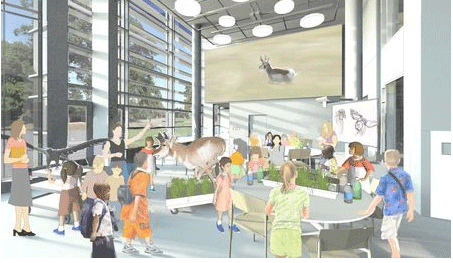
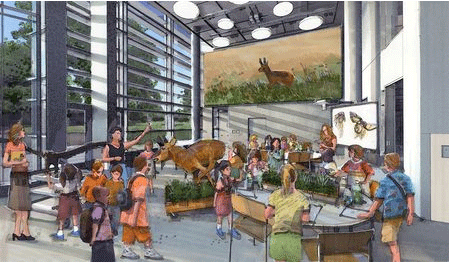
First Generation SketchUp Model. I quickly generated the initial SketchUp model and populated it with lots of children and adults. The scene was reviewed by the museum educational staff and I was advised to remove all of the adult figures except three teachers and triple the number of children in the scene.
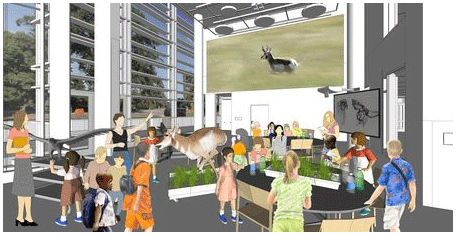
Second Generation SketchUp Model. Compare this model with the previous version and notice the refinements in the model. I carefully placed children in the foreground and background, added the tree photograph in the windows, and added more tabletop projects requested by the teachers. Most of the SketchUp children were from components offered by Entourage Arts. I send this updated scene to my client for approval to continue with the final rendering step
Step 2 - Project Rendering
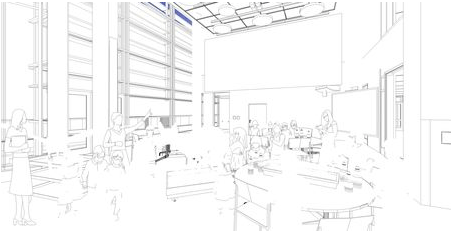
Exported SketchUp Edges. This next process involved rendering the model with the SketchUp plugin called Shaderlight. This photorealistic rendering program established the indoor lighting characteristics in the scene along with the direct sunlight casting shadows across the rear wall. Because the rendering software eliminates all SketchUp edges, I exported the linework from my SketchUp model and combined them with the Shaderlight view.
Printed Composite Model View. After combining the Shaderlight rendered scene with the linework, I adjusted the contrast of the image in Photoshop. This “lightening” of the image was necessary in order to add back color and shadows with colored markers and pencils. The ideal effect is to give the image layer a 75% transparency and the linework a 50% transparency in Photoshop. I printed the view onto 13”x19” matte finish Epson Presentation paper using an inkjet printer.
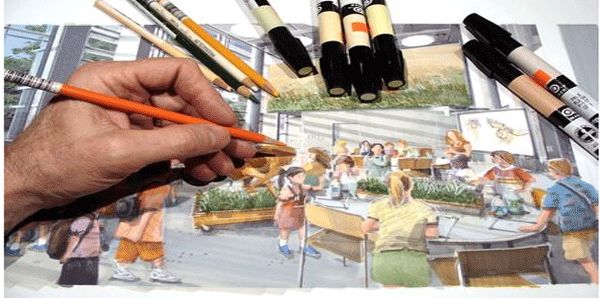
Hand Coloring with Markers and Pencils. This was my favorite step in the rendering process as I was able to add character and informality to the scene using a combination of Chartpak AD markers and Prismacolor pencils. The hand coloring process reduces the computer model dominance and transforms the image into one that appears hand drawn! I added marker shadows throughout and highlighted many of the edges with a white colored pencil.

Final Hand Rendered Scene. Notice how this view has an overall lack of contrast. This was deliberate as I would eventually increase the contrast in Photoshop with the final watercolor filtering step. Hand drawing on the SketchUp model scene created a hybrid visualization that was part 3D digital model and part hand drawing.
Final Digital Watercolor. I scanned the print as a TIFF image at 300dpi and brought it into Adobe Photoshop. Using the watercolor filter, I transformed the image to give it the appearance of a painting. Notice how the marker lines have a darker edge to them - similar to how paint dries on watercolor paper. My final step was to adjust the image contrast and increase the light and dark tones in the image. An enlargement of the final digital watercolor is shown below.

Cross posted from Jim Leggitt Blog

- Sponsored Plugins


- Sponsored Plugins

- Cover Story
-
 SketchUp Can Help You Win Interior..
 -
Best Laptops for SketchUp
-
How to Resize Textures and Materials..
-
Discovering SketchUp 2020
-
Line Rendering with SketchUp and VRay
-
Pushing The Boundary with architectural
-
Trimble Visiting Professionals Program
-
Diagonal Tile Planning in SketchUp
-
Highlights of some amazing 3D Printed
-
Review of a new SketchUp Guide
- Sketchup Resources
-
SKP for iphone/ipad
-
SKP for terrain modeling
-
Pool Water In Vray Sketchup
-
Rendering Optimization In Vray Sketchup
-
Background Modification In sketchup
-
Grass Making with sketchup fur plugin
-
Landscape designing in Sketchup
-
Apply styles with sketchup
-
Bedroom Making with sketchup
-
Review of Rendering Software
-
Enhancing rendering for 3d modeling
-
The combination of sketchup
-
Exterior Night Scene rendering with vray