
Author : Robert W. Lang
SketchUp for Woodworkers - 3D Cutlists for Woodworking Projects
Traditional approaches in woodworking are generally reliable and efficient. If you know something has worked well for other woodworkers for a few hundreds years, you can likely assume that adopting it will be a good way to accomplish what you want to do. But the traditional approach isn’t always the best method forever, and when a new technology comes along, it can make the shortcomings of a traditional approach blatantly apparent.

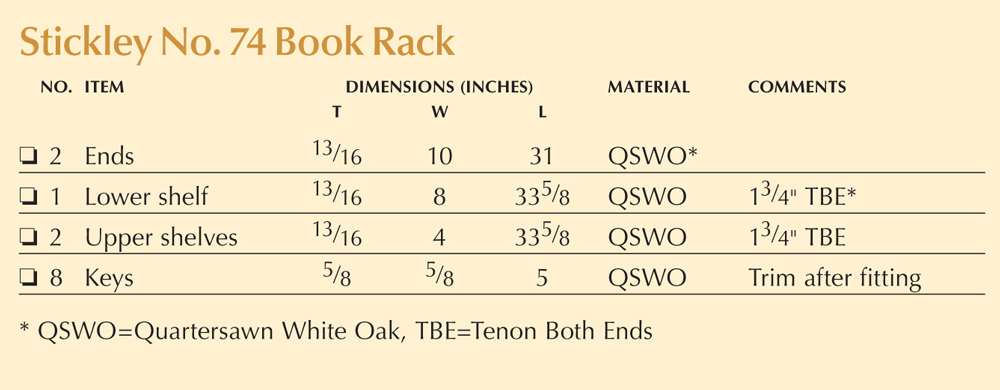
This is the case with shop drawings, cutlists, and the adoption of SketchUp as a design and planning tool. Here is an example, using the Gustav Stickley No. 74 Book rack I built for the August 2012 issue of Popular Woodworking Magazine. The first image (at right) is the illustration as it appeared in print, and the second image (at left) is the cutlist published in the magazine. As a reader, you expect to see this form and we’ve never really questioned whether or not this is what we should print. We do it this way because we’ve always done it this way, as have other publications for the last century or so. But the reasons why these types of drawings were developed isn’t because they are the best way to communicate information, this tradition developed because this is a quick and easy way to create a technical drawing by hand and put it on the printed page.
When I built the piece, I worked from a SketchUp model. I did make some prints from the model to use as a reference in the shop, but what I find useful when building doesn’t look like a traditional drawing. After completing the model, I navigate to an empty area and drag parts of the model from the components window into the model space. This is a simple piece with few parts, but I use the same approach with more complex projects. When the parts are in the model, I move and rotate them so that they are in the same neighborhood. What I’m after is an arrangement where I can clearly see the size and shape of each part.
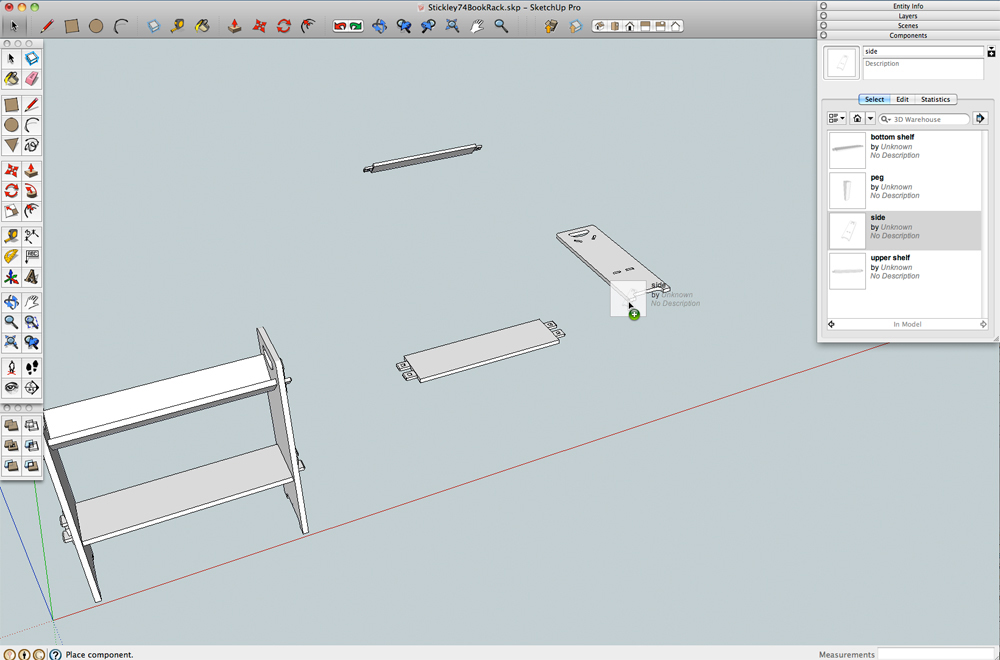
Then I grab the dimension tool from the toolbar and put in the dimensions I want to see when I’m selecting material and fabricating the parts. Because of the way SketchUp works, this process is quite fast. The elapsed time between these two screen shots is about two minutes, far less time than it would take me to write a cutlist the traditional way. It is also far more useful because I can include additional information, such as the size and location of joints, and when I refer to it I don’t have to find a detail in the drawing then hunt it down in the cutlist. The other benefit is that if I have a carefully constructed model – I don’t need to do any calculating to arrive at sizes. All I need to do is click on the right points in the model with the dimension tool, and SketchUp lets me know what the real sizes are.
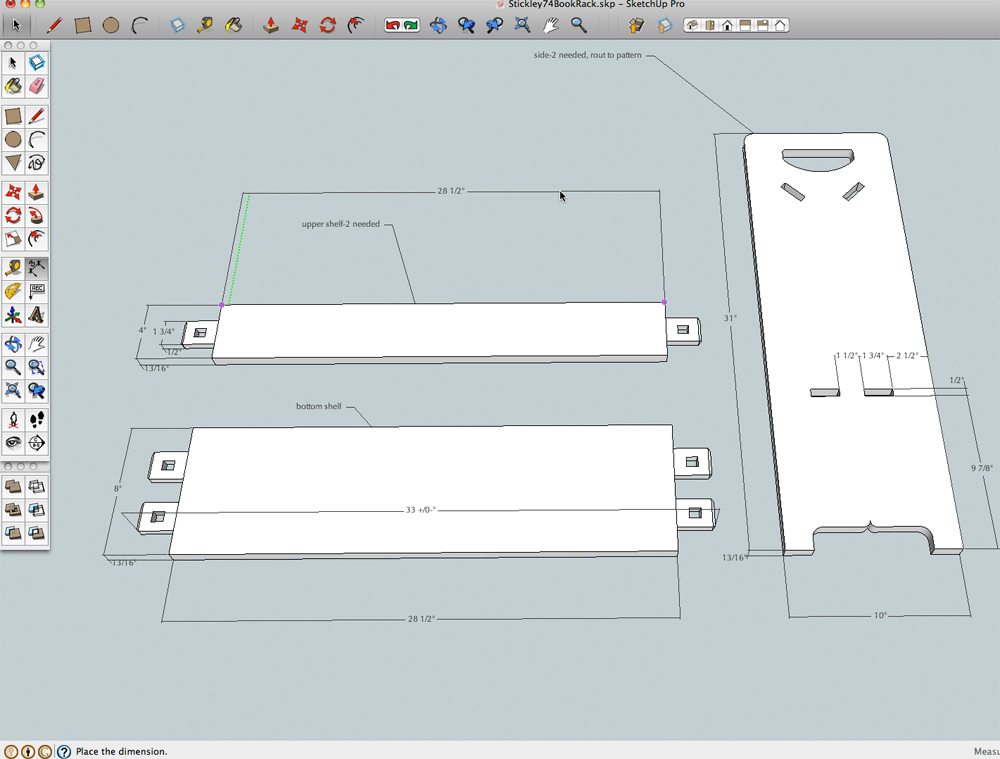
For me, this is the ultimate reason for using SketchUp, it speeds up the process and gets me out to the shop sooner, armed with reliable information so I don’t have to stop building to revisit the planning. In addition to an easy to use cutlist, I also generated full size patterns for the shape of the side pieces. As a bonus, these patterns also gave me the exact location and size of the through mortises.
Contact: Robert W. Lang
Cross posted from Popular Woodworking Magazine

- Sponsored Plugins


- Sponsored Plugins

- Cover Story
-
 SketchUp Can Help You Win Interior..
 -
Best Laptops for SketchUp
-
How to Resize Textures and Materials..
-
Discovering SketchUp 2020
-
Line Rendering with SketchUp and VRay
-
Pushing The Boundary with architectural
-
Trimble Visiting Professionals Program
-
Diagonal Tile Planning in SketchUp
-
Highlights of some amazing 3D Printed
-
Review of a new SketchUp Guide
- Sketchup Resources
-
SKP for iphone/ipad
-
SKP for terrain modeling
-
Pool Water In Vray Sketchup
-
Rendering Optimization In Vray Sketchup
-
Background Modification In sketchup
-
Grass Making with sketchup fur plugin
-
Landscape designing in Sketchup
-
Apply styles with sketchup
-
Bedroom Making with sketchup
-
Review of Rendering Software
-
Enhancing rendering for 3d modeling
-
The combination of sketchup
-
Exterior Night Scene rendering with vray